Hey, have you ever experienced slow internet browsing or loading errors on your Android device? If so, you might want to try clearing your DNS cache. DNS stands for Domain Name System, and it’s a phone book for the internet. It translates domain names like google.com into IP addresses that your device can connect to. Sometimes, your device might store these DNS records in a cache to speed up the process, but this can also cause problems if the records are outdated or corrupted. That’s why clearing your DNS cache can help you fix some common issues and improve your browsing experience. In this blog post, we will show you how to clear DNS cache on Android device in a few simple steps.
Benefits of Clearing DNS Cache on Android Device
If you use your Android device to browse the web frequently, you might have noticed that some websites load slower than others, or that some images don’t show up at all. This could be due to a problem with your DNS cache, which is a temporary storage of information about the websites you visit.
- Sometimes your DNS cache can become outdated, corrupted, or full, and this can affect your browsing experience. After clearing the DNS cache, it will be updated to its latest one and you will get a smooth experience while accessing websites.
- Clearing your DNS cache on your Android device will force your device to fetch the latest information from the DNS servers, and potentially speed up your web browsing and resolve any errors.
- Clearing your DNS cache is also a good security practice, as it can prevent hackers from redirecting you to malicious websites by tampering with your DNS records.
How to Clear DNS Cache?
The DNS cache on Android gets automatically cleared almost all the time and updated whenever necessary. You do not have to clear the DNS cache manually. But if you feel any issues while accessing a website almost all the time it’s a better idea to clear DNS cache on Android. Let’s see how to do it.
Clear DNS Cache on Chrome Browser
- Open Chrome Bowser.
- Enter on the address bar: chrome://net-internals/#dns
- Now tap on Clear host cache.

Now you have successfully cleared the DNS cache on the Chrome browser.
Clear DNS Cache on Microsoft Edge Browser
- Open Edge Bowser.
- Enter on the address bar: edge://net-internals/#dns
- Now tap on Clear host cache.

Now you have successfully cleared the DNS cache on the Microsoft Edge browser.
Clear DNS Cache on Brave Browser
- Open Brave Bowser.
- Enter on the address bar: brave://net-internals/#dns
- Now tap on Clear host cache.

Now you have successfully cleared the DNS cache on the Brave browser.
Clear DNS Cache for Other Browsers
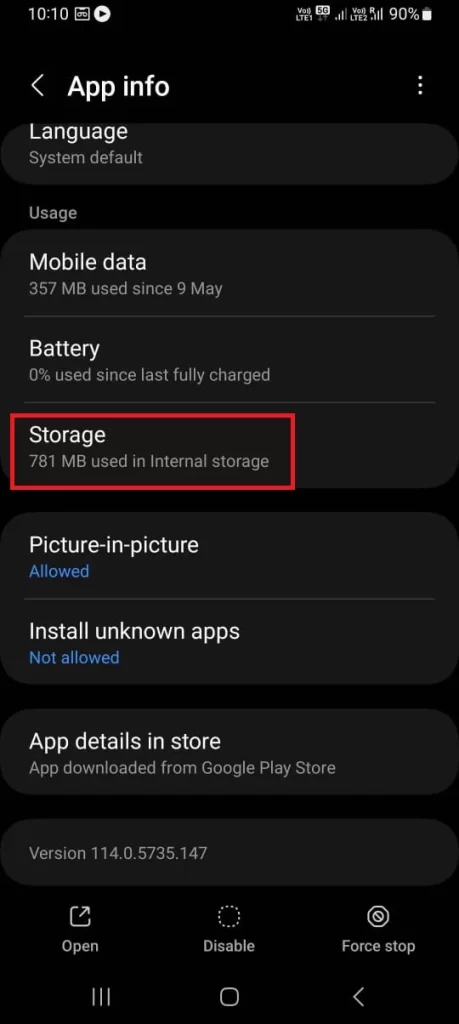
This method will clear the DNS cache on your Android device for all types of browsers. It doesn’t matter which browser you are using.
- Long Press on the default browser present on your Android device.
- Tap on App info (i icon in a circle).
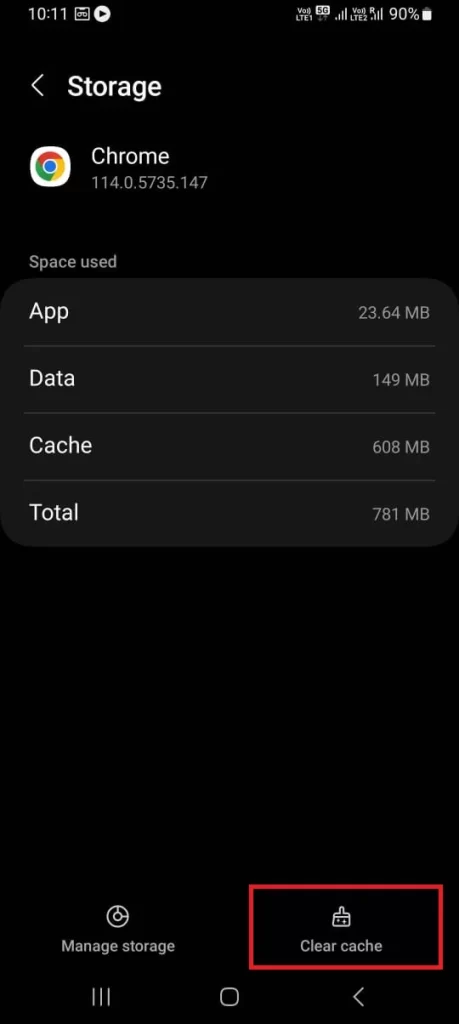
- Now tap on Storage (or Storage usages) under section Usage.
- Tap on Clear cache.


It will clear the stored cache and DNS cache in the browser on your Android phones (or devices).
Conclusion
Clearing the DNS cache on your Android device can help resolve common browsing issues and improve your overall experience. By clearing the cache, you ensure that your device fetches the latest information from DNS servers, potentially speeding up your web browsing and resolving errors. It also serves as a security practice, protecting you from potential malicious website redirects. While the DNS cache on Android is usually cleared automatically, manually clearing it can be beneficial if you are experiencing persistent issues.
Must Read
How to Delete RAM Cache on Windows 11?
Chrome Uses So Much RAM. How to Fix it?
Please comment and Contact Us for any discrepancies. Follow MambaPost on Facebook, Twitter, and LinkedIn. For the latest Tech News checkout at MambaPost.com.


4 thoughts on “How to Clear DNS Cache on Android Device”
Comments are closed.