In this blog post, we will show you how to change the desktop icon size on Windows 11. If you are like me, you probably have a lot of icons on your desktop and sometimes they can look too small or too big for your liking. Just because of this, we want to change the icon size. Well, do not worry, because changing the icon size in Windows 11 is super easy and you can do it in just a few steps. Here are the 3 simple ways to how to do so:
(1) Change Desktop Icon Size using Mouse
This process is a really handy way to change the desktop icon size on your Windows 11 PC. This can do the icon of the computer’s desktop bigger or smaller. Instead of using any complicated method, all you have to do is use your mouse to easily change the size of the icons of your desktop folders. You can also make them look exactly the way you want to see them with just simplicity. It is so simple; anyone can do it. let’s see how to do it:
To change the size of icons on your computer’s desktop, you can use a really cool trick. Just hold down the Ctrl key on your keyboard and move the scroll wheel on your mouse up or down. As you do that, the icons will magically get bigger or smaller right in front of your eyes.
The best thing about this method is that you are not stuck with only a few choices. Here you have the power to make the desktop icons exactly the size you want. It’s like having a magic stick that lets you fine-tune the size of the desktop icons and make them fit into the style of your choice perfectly. So go ahead to use this step, and have fun customizing your desktop icons to match your preferences. Let’s see other methods to change the desktop icon size on your Windows 11 PC, and that is by using Keyboard Shortcuts.
(2) Change Desktop Icon Size using Keyboard Shortcuts
This process also is a handy way to change the desktop icon size on your Windows 11 PC. Let’s see how to do so:
- For Small Size Icons press Ctrl + Shift + 4
- For Medium Size Icons press Ctrl + Shift + 3
- For Large Size Icons press Ctrl + Shift + 2
See how it is simple! Press the respective key of your choice and change the icon size as per your need. If you want another way to change the desktop icon size then move to the next step of changing the desktop icon size with the desktop context menu.
(3) Change Desktop Icon Size from the Desktop Context Menu
The process of changing the desktop icon size with the desktop context menu is very easy. Let’s see how to do so:
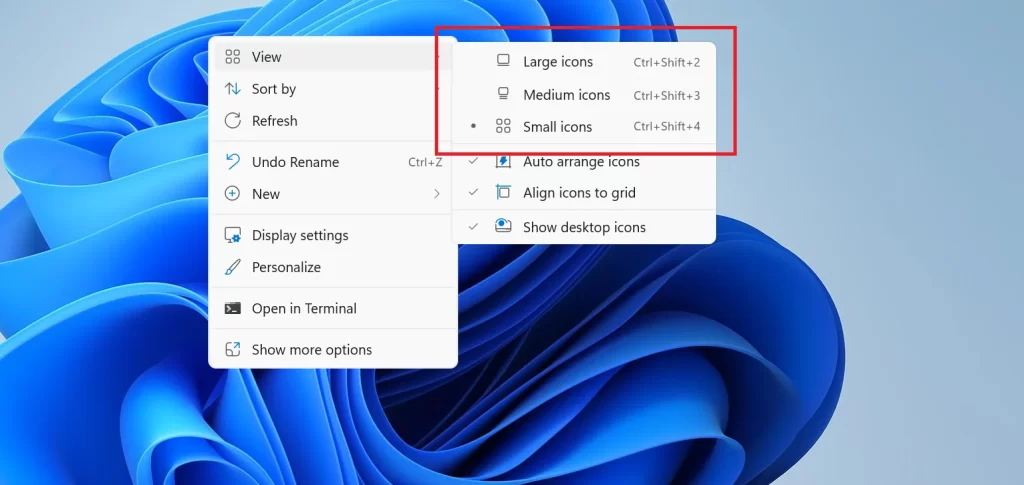
- First, you have to do is, Right-click on your Desktop.
- Now from the context menu here, you select the View option.
- Here you will see three options available: Large icons, Medium icons, and Small icons. By default, it is Medium. Now select the size that you want and click on it.

After clicking the specific size, you want, your desktop icon size will be changed on your Windows 11 PC.
Conclusion
Windows 11 empowers you to personalize your computer experience. Changing desktop icon size has many ways, like through the keyboard shortcuts, through the display context menu, or through the mouse. Select the process or ways that you liked most. That’s all about this blog post. If you are not able to change the desktop icon size then you can contact me any time via the contact us page.
Read Must
Fix Wi-Fi Not Asking Passwords on Windows 11
Fix Night Light Not Working on Windows 11
Please comment and Contact Us for any discrepancies. Follow MambaPost on Facebook, Twitter, and LinkedIn. For the latest Tech News checkout at MambaPost.com.
2 thoughts on “How to Change Desktop Icon Size on Windows 11”
Comments are closed.