
Have you ever felt slow internet speed or issues connecting to websites on your iPhone? It might be because of the DNS cache and you might want to clear the DNS cache on your iPhone. Clearing your iPhone DNS cache will help you fix slow browsing speeds or other connectivity issues.
What does a DNS Cache stand for?
The DNS cache is like a phonebook that your iPhone (all models) uses to look up and remember the IP addresses of websites you visit.
In other words, you can say that it’s like a temporary record maintained by your device (i.e., iPhone) that contains information about the websites or links you have visited and their corresponding IP address. Over time, this cache may become outdated or corrupt for unknown reasons, which can cause slow internet speed and connectivity issues.
Clearing the DNS cache can help resolve these issues and speed up your browsing experience. Let’s see in detail how you can clear the DNS cache on your iPhone.
How to Clear the DNS Cache on Your iPhone
Clearing the DNS cache on your iPhone is very simple and easy. Let’s see the methods to clear it.
1. Enable and Disable the Airplane Mode
The quickest way to clear the DNS cache on your iPhone is to toggle the Airplane Mode on and off. This will reset all your network connections. Let’s see how to do this.
- First, swipe down from the top-right corner of your iPhone screen to open the Control Center.
- Tap on the airplane icon to turn on the Airplane Mode.
- Wait for 10-20 seconds, then tap on the airplane icon again to turn off Airplane Mode.
Alternative way:
- Open the Settings App.
- Turn on the toggle switch next to the Airplane Mode.
- Wait for a few seconds, then turn off the toggle switch next to the Airplane Mode.
2. Restart (or Reboot) Your iPhone to clear the DNS cache
Restarting (or rebooting) your iPhone is another effective way to clear the DNS cache. It can often fix almost all the issues you facing on your iPhone including DNS cache.
3. Reset Network Settings to Clear the DNS Cache
If the above two steps are not working, you can try resetting your network settings. This will reset your Wi-Fi networks and their passwords, cellular settings, and VPN and APN settings. Let’s see how to do this:
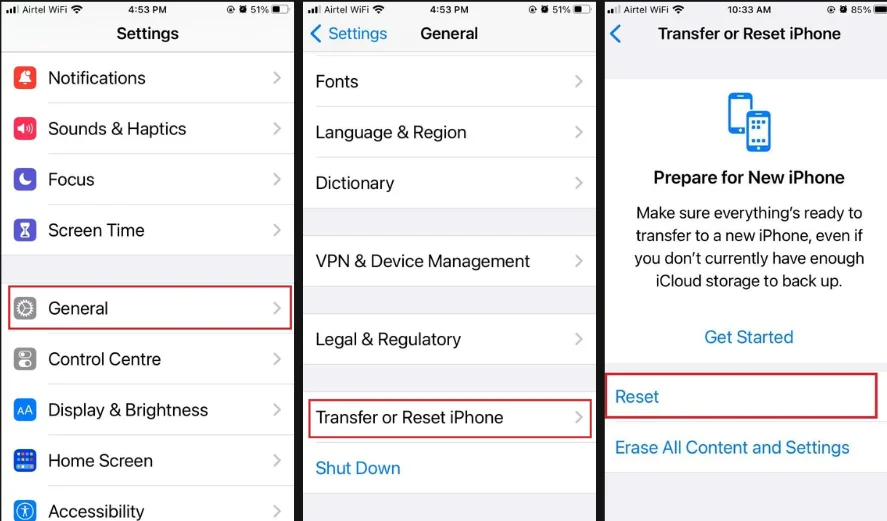
- Open the Settings App.
- Tap General.
- Tap Transfer or Reset iPhone.
- Then, tap Reset.
- Tap Reset Network Settings and enter your iPhone passcode if prompted on the screen.
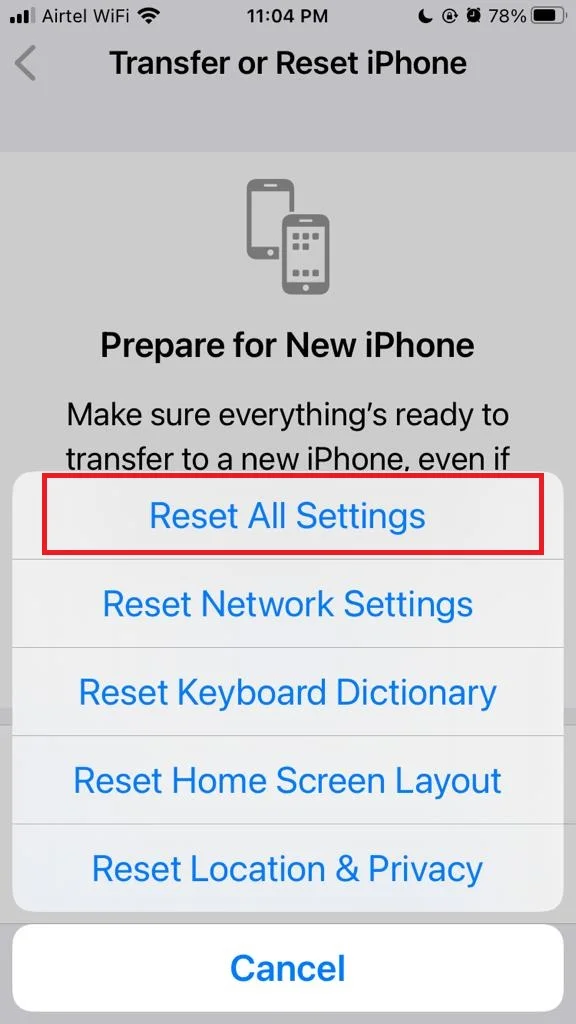
- Confirm your choice that you want to reset the network settings.
That’s it! You successfully cleared the DNS cache on your iPhone. Remember, clearing the DNS cache will not delete personal data or settings beyond your network preferences. It’s a safe and quick procedure. It can often resolve persistent network-related issues.
Conclusion
Maintaining the performance of your iPhone also includes managing the DNS cache effectively. Whether you try the quick toggle of Airplane Mode, a full restart (or reboot), or reset network settings, all methods are easy and can lead to a faster browsing experience. By regularly clearing the DNS cache on your iPhone, you can ensure that your iPhone is not filled with old or corrupted data. Remember, a well-maintained device is a happy device, and a happy device means a happy user. We hope you liked the blog post on how to clear the DNS cache on your iPhone and found it useful for you.
Must Read