Did you know that you can use the Apple Check In feature to let your friends and family know where you are and what you’re up to? Apple Check In is a new feature that lets you easily share your location and status with your friends and family. It is also a convenient way to stay connected with your loved ones. Let’s see how to use Apple’s Check In on your iPhone.
What is Apple Check In Feature on iOS 17?
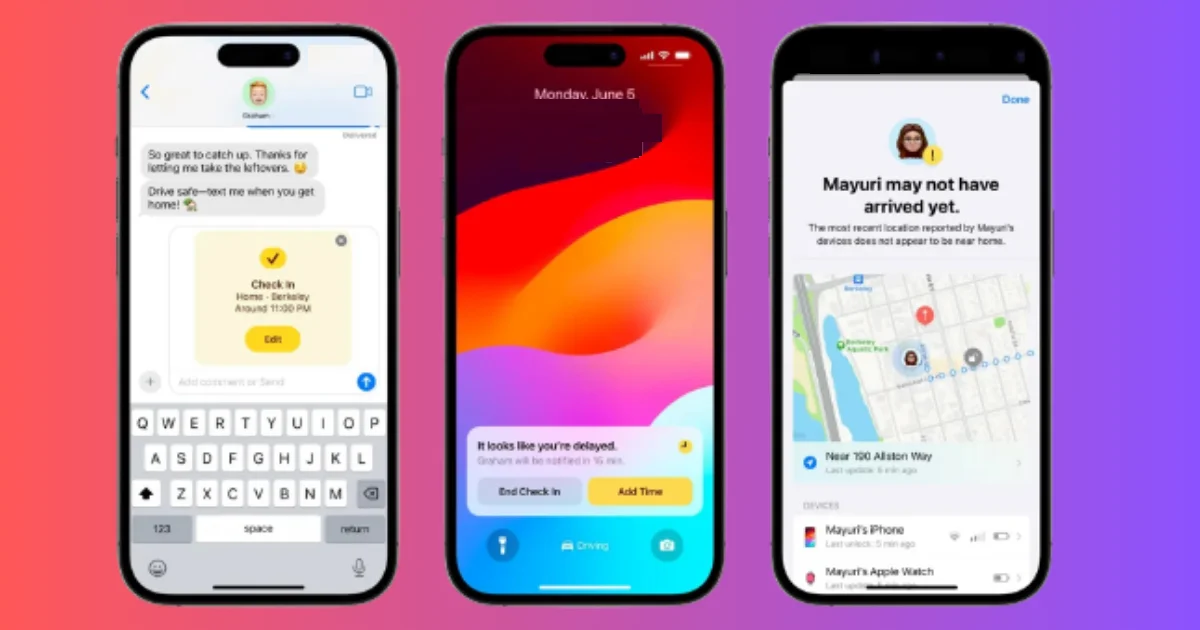
We all always want our loved ones to be very safe and sound. But sometimes I slip up and forget to text them when I get home, and they start to worry. That’s why I love Apple Check In!
The new Apple Check In feature in the Messages app lets you easily tell your friends and family that you made it to your destination without any trouble.
If you’re not getting closer to where you’re supposed to be or you’re running behind schedule, your iPhone will share some important info with the contact you choose. Things like your location, battery level, network signal, and when you last used your iPhone or Apple Watch. And don’t stress; all your data is super secure. Now that you know the basics, let me show you how to use the Check In feature in iOS 17.
Prerequisite to Use the Apple Check In Feature in Messages App on iPhone
- Make sure the Locations Services for iPhone is already enabled.
- iOS software must be updated to its latest version iOS 17 on both devices i.e., the sender and the receiver.
- The sender should have an internet data plan on their device.
How to Use the Apple Check In Feature in Messages App on iPhone
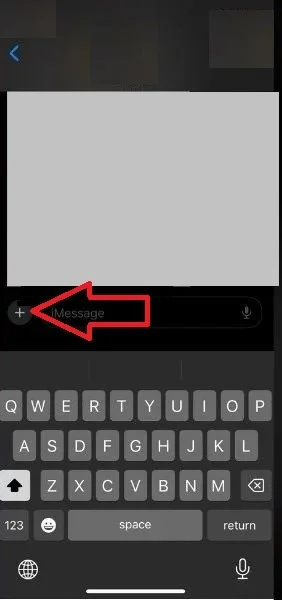
- Tap on the Messages app.
- Tap on the contact with whom you want to share Check In details.
- Now tap on the + (Plus) icon (at the bottom left).
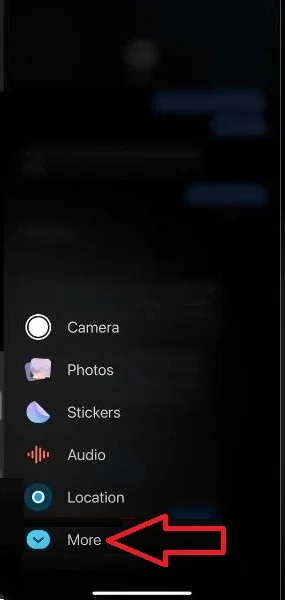
- Here You need to tap on More.
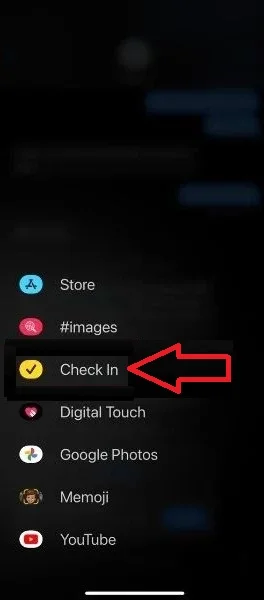
- Tap on Check In.
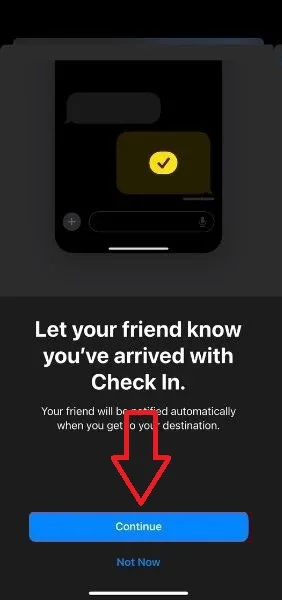
- Tap on Continue.
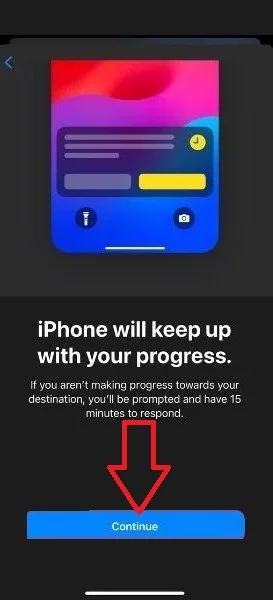
- Again, tap on Continue. (if you are using this Check In feature the first time).
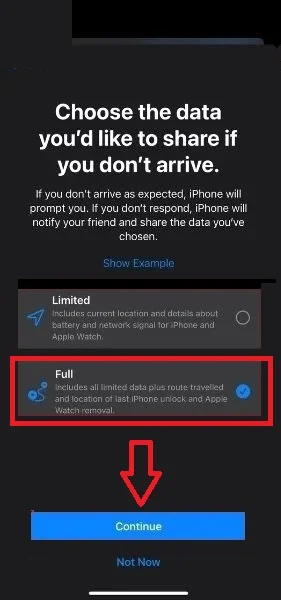
- Either select Limited or Full. Tap on Continue.
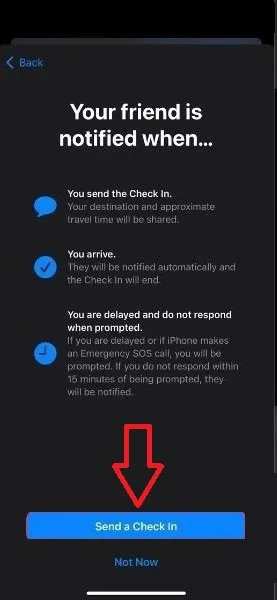
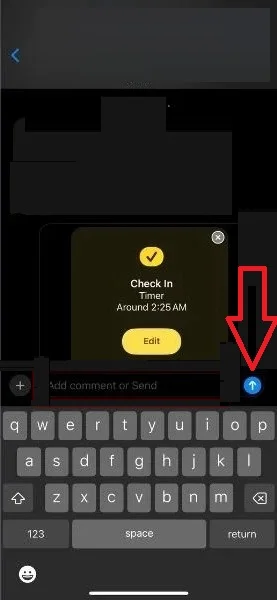
- Now tap on Send a Check In. Here, you will see the Check In icon in the text box.
- Now, tap the send icon (the arrow in the blue circle at the bottom right) to share your Check In.

That’s it! You successfully sent your Check In to your loved ones. You can also edit your Check In before sending it to your loved ones. Let’s see how to do this.
How to Edit the Apple Check In Feature in the Messages App on iPhone
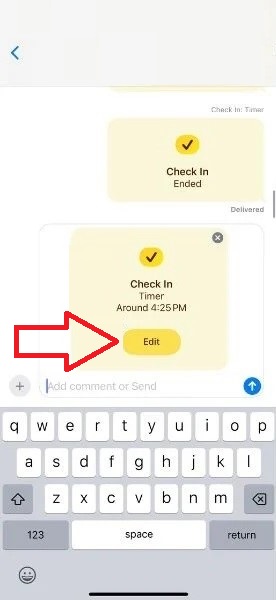
- Tap on the Messages app.
- Tap on the contact with whom you shared Check In details.
- Now tap on Edit.
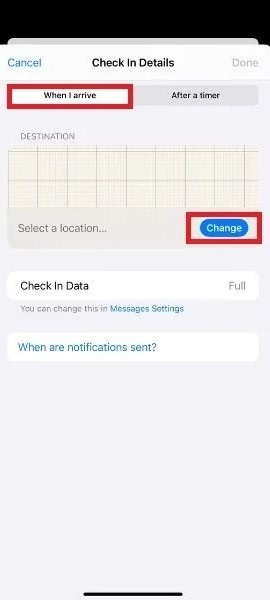
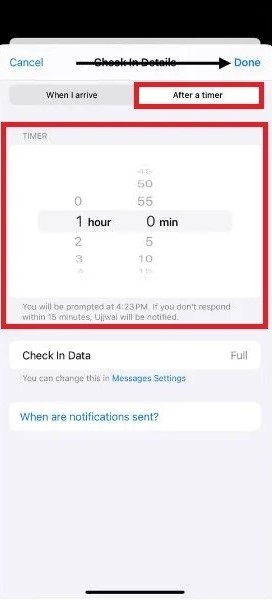
- (a) Tap on When I arrive if you want to add a new destination. To add a destination, tap on Change. Here you can also select the ESTIMATED TRAVEL TIME from Driving, Transit, or Walking. (b) If you want to set a timer that prompts you to update your progress, tap on the After a Timer tab. The time limit to respond to a prompt is 15 minutes. Set the time. If you do not respond within 15 minutes, your iPhone will notify the specific contact (as earlier selected by you for the Check In feature).
- After making the necessary adjustments, finally tap on Done (top right corner)
- Now, finally tap on the send icon (the arrow in the blue circle at the bottom right) to share your Check In.

This feature lets the recipient that you have safely arrived at your destination, completing the check-in process. If you are late, you can also adjust the ETA (estimated time of arrival) accordingly.
That’s it! You’ve just learned how to use the Apple Check In feature on your iPhone.
Conclusion
The Apple Check In feature on iPhone is a great and easy way to let your friends and family know where you are and what you’re up to. You can easily tell your friends and family that you made it to your destination without any trouble. Try it out and let us know what you think about the Apple Check In feature in the comments below!
Image Credits: Apple and TechPP
Must Read
- How to Resolve Call Failed or Call-Ended Issues on Your iPhone?
- How to Enable Reduce Loud Sounds Feature on Your iPhone or iPad?
Please comment and Contact Us for any discrepancy. Follow MambaPost on Facebook, Twitter and LinkedIn. For the latest Tech News checkout at MambaPost.com.
3 thoughts on “How to Use the Apple Check In Feature on iPhone?”
Comments are closed.